


| FAQ #67 | |
   |
|
 |
Fit the USB BOX 9702.EZ |
 |
The actual Citroen instructions are available here to download - Click Here - However lets make it a bit easier for a right hand drive C4! and those wanting to use an iPod. [shadowbox=images/c4/usb_box/radio-out.jpg|Removing the RD4 Radio||right]  [/shadowbox] OK first thing to do is remove the radio. (or if you have a CD Multi changer remove the CD's!!! then the radio) [/shadowbox] OK first thing to do is remove the radio. (or if you have a CD Multi changer remove the CD's!!! then the radio)Personally I didn't disconnect the battery. I simply left the ignition turned off as I didn't want to have to recode the radio by disconnecting the power supply This then gives you access to the rear of the radio and the input sockets [shadowbox=images/c4/usb_box/no-cd.jpg|Free Ports||]  [/shadowbox] [shadowbox=images/c4/usb_box/cd-port.jpg|CD Multi changer Port||] [/shadowbox] [shadowbox=images/c4/usb_box/cd-port.jpg|CD Multi changer Port||] [/shadowbox] [/shadowbox] [shadowbox=images/c4/usb_box/usb-box-in.jpg| USB BOX plugged into the RD4 Radio||right]  [/shadowbox]If the CD port is empty you can plug the USB BOX lead straight in however it won't work as you will need to get it enabled by a dealer laptop. [/shadowbox]If the CD port is empty you can plug the USB BOX lead straight in however it won't work as you will need to get it enabled by a dealer laptop.If the CD Multi changer is fitted then simply pull it out and replace with the USB BOX lead and when you power up you can use 'source' on the radio to read your iPod Next is where things differ from Citroen. Basically they recommend fitting inside the glove box which is a good idea but means a bit of work removing it and I couldn't be bothered! [shadowbox=images/c4/usb_box/usb-box-hide.jpg| USB BOX hidden under the dash||right] 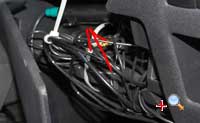 [/shadowbox]So, if you want to use a USB stick but if your using an iPod, MP3 player they you can hide the box away below the steering column. [/shadowbox]So, if you want to use a USB stick but if your using an iPod, MP3 player they you can hide the box away below the steering column.Simply pull the cover off and you can get easy access. Mine looks cluttered as I have an extension and splitter for the power to a Road Angel and Sat Nav and I simply used double sided tape to stop the USB BOX sliding around Then plug in the dedicated iPod cable supplied and snap the cover back and feed the cable under the edge of the centre console [shadowbox=images/c4/usb_box/usb-cable-hide.jpg|Hide the USB cable||] 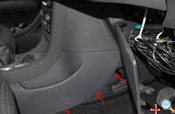 [/shadowbox] [shadowbox=images/c4/usb_box/ipod-lay.jpg|iPod on the ash tray||] [/shadowbox] [shadowbox=images/c4/usb_box/ipod-lay.jpg|iPod on the ash tray||] [/shadowbox] [shadowbox=images/c4/usb_box/ipod-slot.jpg|iPod slotted away||] [/shadowbox] [shadowbox=images/c4/usb_box/ipod-slot.jpg|iPod slotted away||] [/shadowbox] [/shadowbox] You can then lay the iPod on the ash tray or stick into the slot by the footwell (assuning a VTR+ spec) For me thats better as I can quickly remove it from the car, push it under the seat etc. depending on what I'm doing Once powered up and working re-fit the radio and read the user guide here - Click Here - on how to read rtrack info. Sound quality is excellent, you can ajust the volume, skip forward, mute the sound etc. from the sterring column controls and the iPod charges whilst the car is running. Perfect! .......................................................................................... Dropthepuck has also fitted this but in the glovebox where Citroen recommend so here is his tutorial on it Well, I installed my USB Box this morning in my C4 5-door. I used a combination of c4owner's instructions and the one's provided with the unit itself - I did not disconnect the battery. I was determined to get it mounted in the glove-box, and started to try to remove the glove box. After about half an hour of fighting with that, I gave up. It probably would have made life easier but I managed without, but removing the glove box door from it's hinges (just give a hard pull) did help with some access issues. I also did turn off the passenger airbag at this point. I have heard of airbags being deployed when people start messing around under the dash board. Whether just turning it off with the key would prevent this - I don't know, but I felt better for doing it. That may be why the installation manual says to disconnect the battery. Firstly, I removed the RD4 head unit using removal tool bought from Maplin (£1.99). I then temporarily hooked up the USB Box to the head unit to make sure it worked before installation - it did! Unplugged both ends, and then thread the right end (learn by mistake!) of the cable through the access hole on the top, right hand side of the glove box. Somehow I managed to grab the plug through the slot where the head unit was (small hands and long fingers help here). The plug/cable should appear from the same area that the main head unit cables go through. With that done, then came the task of mounting the USB Box itself. I mounted the unit to the roof of the glove box, just to the left of the bottle cooling vent (I think that's what it's for) - it fits there quite nicely. Just be sure that the vent control can still turn. I marked where the holes for the attaching screws should be and drilled some small pilot holes. (Be careful when drilling the pilot holes that you do not push the drill bit too far through the hole, since there are some electrical components on the other side - not desperately close, but it pays to be cautious) The left hand side of the box will push up right against the glove box shroud, so I screwed the two left screws halfway, and then just slipped the left tabs of the USB box onto them before attaching the right side screws (The screws supplied are not normal Philips screws, but no. 10 Torx screws, so make sure you have the right type of driver - a short handled one would be best due to limited space, or use different self-tapping screws). Once again due to limited space, I attached the cable to the back of the USB box before finally securing it. Attach the other end of the cable to the head unit, replace head unit, glove box door and job done - took about an hour plus the time faffing about with the glove box removal that didn't work. Tools I wish I had:
So, after it was all done, I followed the instructions in the user manual to get the text display working. I intend to use this with a 4 gig USB memory stick The ultra-small Staples brand (£17.99) works fine. I must have done something wrong when ripping my Cd's to mp3 on my memory stick, since the band name and album name are the wrong way around in the hierarchy. I tried my son's iPod Nano and it was just fine, so I'll have to look at that this evening. All in all not too bad and saved me £130 on installation by the dealer. The first picture show the head unit removed, with the USB Box cable tied up and "disappearing" to the glove box area. The second picture shows the USB box attached to the roof of the glove box with the cable going through the access hole on its way to the head unit. [shadowbox=images/c4/ice/usb_fit1.jpg| USB Box fitting||]  [/shadowbox] [shadowbox=images/c4/ice/usb_fit2.jpg| USB Box fitting||] [/shadowbox] [shadowbox=images/c4/ice/usb_fit2.jpg| USB Box fitting||] [/shadowbox] [/shadowbox] All in all not that hard to install, even without removing the glove box. The biggest problem was attaching the USB Box due to lack of space. As, I said before a small right angled power driver would really help here. I have done a little experimenting as far as getting the display to display correct artist/band track info if using a USB memory stick. If using an iPod, which I don't have, although my son does, there is no problem, because I checked. When ripping to a memory stick, the ripping software will first create a directory for the artist, then one for the album name and then one for the name of the track. So, for example if windows calls your memory stick drive D:, it would create D:\artist\album name\title1, title2 etc. 2 directories have been created - one for artist and one for album name. I was expecting, when operating the USB Box with a memory stick that the first thing you would see would be a list of artist names. A click of the right arrow on the head unit would bring up the list of albums by that artist. You could then select your album and play it. Something like this happens with the iPod, although there is the added playlist, genre function. However, it seems with the memory stick, you only get one directory level, and that would be the last one, ie album name. Clicking the right arrow then takes you to the track listing. This is a bit disappointing, but I suppose that is a limitation of using a memory stick, unless I have missed something. I also tried creating multiple directory levels, and in each case it always goes to the last directory. |
| Views | 148135 (Unique 139285) |
| Member Rating : |   8.9 - 14 votes 8.9 - 14 votes |
| FAQ Posted by | Dave_Retired. |
| Info | Created: 11 February 2008 Last Updated: 24 April 2010 |
Site Disclaimer | Privacy Policy | Cookie Policy |Contact Details | Car Warranty | Sitemap | RSS Feeds | C4 Insurance | Tutorials | Quick Facts | Used Car Guide | Re Call Info | Offers | Service Reviews | Technical Documents | Error Codes
Theme by e107wORks© 
 With Graphics from: Dave Forum Icons by Axialis Emotes by Seb
